Customer Support/Connection Procedures
Access the Horizon FTPS Server
In order to upload or download data to or from Horizon's FTPS server, Horizon customers will need to use an FTP client and authenticate using a secure account. FileZilla is a free multi-platform FTP client which can be installed and configured quickly and easily. This article will detail the process to download and install FileZilla and configure the Horizon FTPS server for customer access. Other FTP clients can be used provided they support FTP over TLS with explicit encryption.
Your Horizon FTPS credentials can be provided by your Horizon project manager. If you do not have them or they aren't working, please contact your Horizon project manager.
Procedure
- Download the FileZilla client.
- Run the FileZilla client installer, accepting defaults in the wizard. Decline any optional offers during installation, such as AVG Secure Browser.
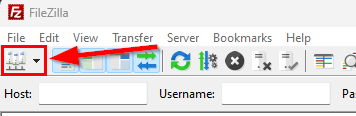
- Run FileZilla and click the Hosts button on the toolbar:

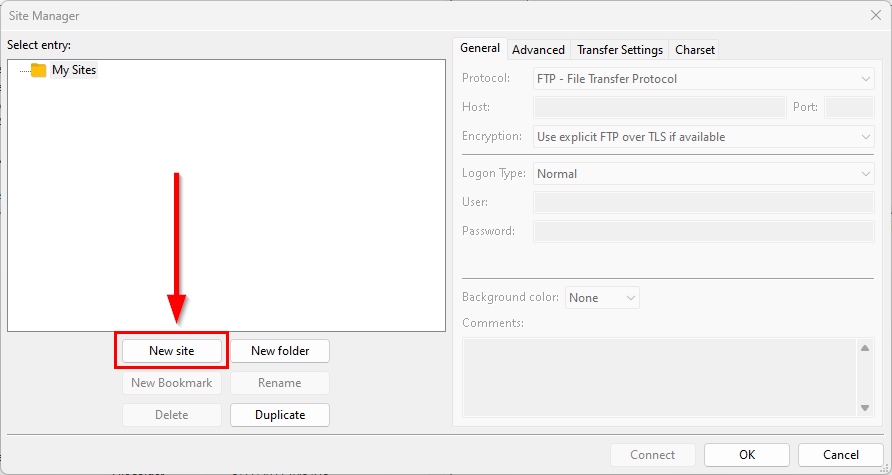
- Click the New site button:

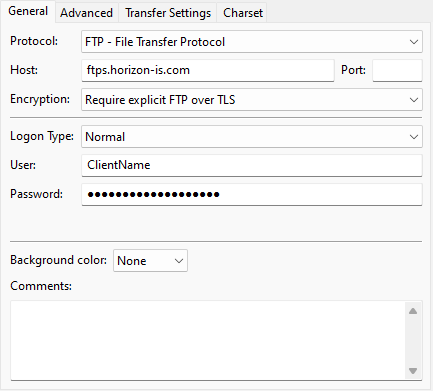
- Enter the following information:
- Protocol: FTP - File Transfer Protocol
- Host: ftps.horizon-is.com
- Encryption: Require explicit FTP over TLS
- Logon Type: Normal
- User: [ClientName]
- Password: [ClientPassword]

- Click the Connect button, choose the Save passwords option, and click the OK button.
- If an Unknown certificate window appears, confirm the SSL certificate lists "ftps.horizon-is.com" in the common/alternative names, check both boxes at the bottom of the window to trust the certificate, then click the OK button.
- FileZilla should make a secure connection to the Horizon FTPS server and place you in the customer's secure directory.
- You can now drag-and-drop files between the local machine and the Horizon FTPS server as needed.
Establish a Remote Support Connection
During a routine troubleshooting process, our technicians may require temporary remote access to your computer. Use this process to connect to a secure remote session a Horizon technician has prepared for you.
Procedure
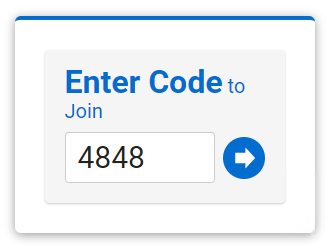
- Open a web browser and navigate to https://horizon.help.
- You will be prompted to enter a code; Your technician will provide your personal code, type the code and click the blue arrow button:

- A file called ScreenConnect.Client.exe will be downloaded, click the file to run the remote connection tool.
Setup New Horizon User
SETUP A NEW USER
All steps are done in the HZHS16.exe program
Open the Horizon Administrator V16 module (Horizon Software > Shared > Programs > HZHS16.exe)
(right click on a module shortcut on the desktop - select OPEN file location. then navigate to Horizon Software > Shared > Programs > HZHS16.exe)
ADD NEW USER
COMPANY SECURITY
The following instructions will allow access to the company files, i.e., C001, C002, etc.
ENABLE MODULE(S)
The following instructions will set a module to be enabled or disabled.
-
Click SAVE
-
The PAYROLL program is always automatically disabled for all users.